How can we help?
How To Turn Off Payment Methods Like Klarna, Afterpay, Etc.
This article will show you how to turn off (or turn on) different payment methods that appear on your Fern CRM order forms, invoices, payment links, etc.
This article is specifically about payment options related to your Stripe account integration, including Klarna, Afterpay, Affirm, Apple Pay, Google Pay, and more.
If you’re looking for help with other Payment Integrations – including Paypal, NMI, Authorize, Square, etc. – check out the other Payment Integration articles here: Payment Integrations info
Stripe Settings
Start by going to your Payment Method settings inside your Stripe dashboard. At the time of this writing, this direct link works:
https://dashboard.stripe.com/settings/payment_methods
If that link doesn’t work or takes you somewhere else, just use the search box at the top of any page inside your Stripe Dashboard and search for “payment methods.”
This will bring you to a page that looks something like this:
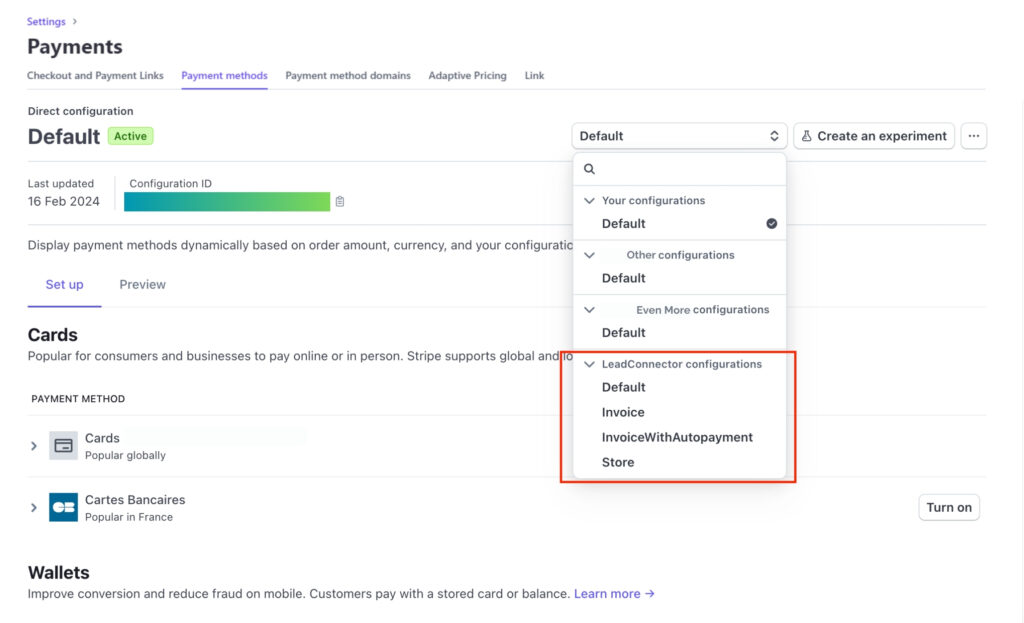
Find the dropdown menu you see circled in that image by clicking on the word “Default” that’s next to the “Create an experiment” button.
Once you’ve got the dropdown menu open, choose from the LeadConnector configurations list.
Personally, I start with “Default” under “LeadConnector configurations” to turn on/off any payment methods I want to be on/off in all situations.
Then, I repeat the steps with “Card Only” (not shown in the screenshot but you should see it in your menu) and then again with “Invoice” (again, all of these are under the LeadConnector configurations heading) for the options I want to be specific to those types of payments. (And I like to double check that turning things off on the Default page also turned them off on the other pages. Because sometimes it does, sometimes it doesn’t.)
Card Only will affect your checkout order forms and invoices will affect your invoices.
You might want to turn some things on for Invoices (like ACH or bank deposits) but turn them off for Card Only and vice versa.
Once you’ve chosen a configuration (Default, Card Only, Invoice, etc.), go through the list of options and turn them on/off according to your preference.
For example, if you scroll down to the “Buy now, pay later” section of this page, you’ll see something like this:
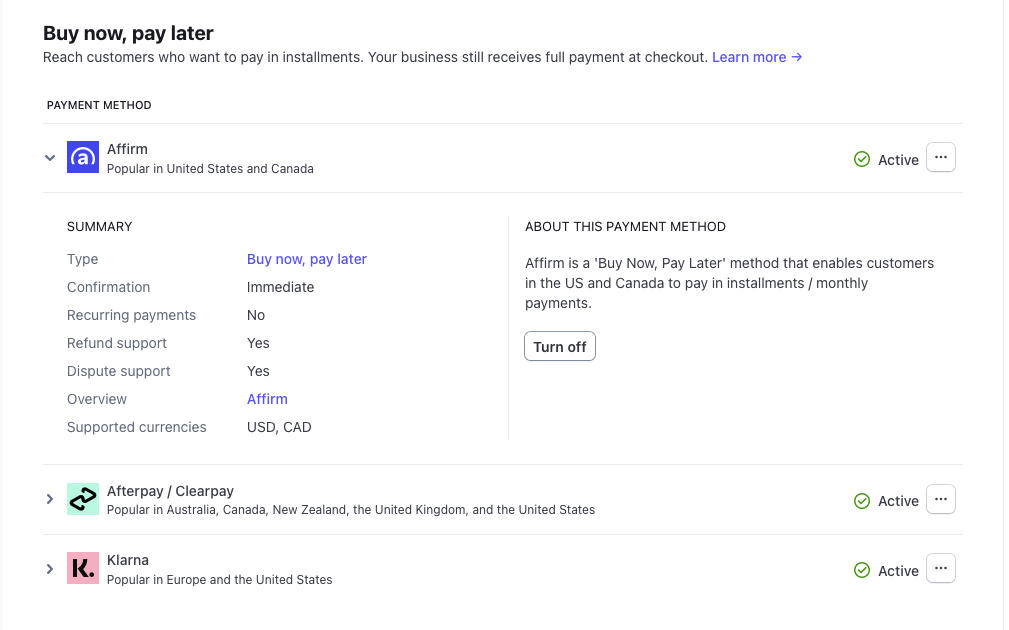
Click on the word “Active” next to the green checkmark to open the dropdown section that includes “Summary” and “About this payment method.”
Find the button that says, “Turn off” and click it to turn off that option.
Once you click the button and it has time to react, you’ll see the green checkmark disappear and the word “Active” change to a button that says, “Turn On.”
Note: You don’t have to answer their little survey about why you chose to turn it off. You can if you want to or just ignore it.
The reverse is true for turning things on instead of off. Instead of the word “Active” and a green checkmark, you’ll see a button that says, “Turn On.” Click the button and wait for it to change to “Active” with a green checkmark.
Once you see the change, you’re ready to move onto the next thing you want to turn on or off.
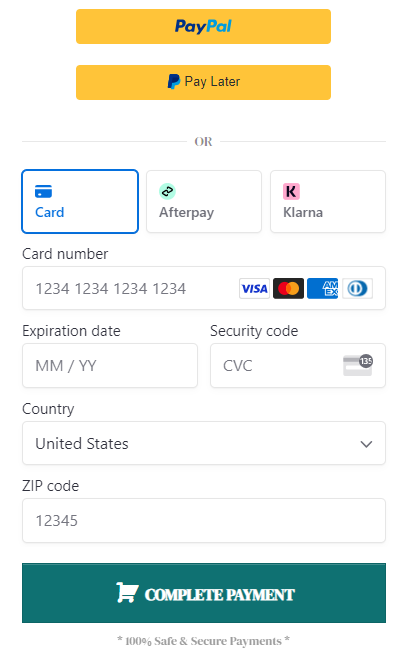
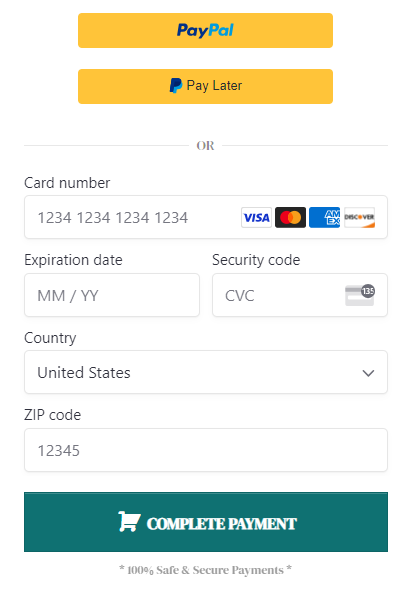
Once you’ve got all the settings the way you want them, head back to your Fern CRM checkout page and you should see the changes immediately:
Checkout page with Klarna and Afterpay turned on:
Checkout page after Klarna and Afterpay are turned off:
If An Option Says “Blocked”
You may notice (especially when you’re on “Card Only” or “Invoice”) that some of the options say “blocked” and the Active/Turn On buttons are shaded out and can’t be clicked.
This simply means you turned them off in the “Default” settings and so now they’re “blocked” in the individual settings. To fix that, simply pop back to the “Default” page under the “LeadConnector configurations” and turn on the ones you want access to. Then go into the individual pages to turn them on/off as you prefer.
Questions, Issues, Troubleshooting, Etc.
If you have any questions or need help with this, you can:
- comment below (which can be viewed publicly)
- post in the Fern Brain Trust community (which can only be seen by other members and the Fern CRM Team)
- show up to an Office Hours session (which can only be seen by other attendees who are live on the call)
- or book a 1:1 session for complete privacy
All support options are linked in the left sidebar of this article and you’ll also find them inside your Fern Action Center dashboard.
To access the Fern Action Center, click the “Help & Support” button in the left sidebar of this article or use the “Action Center” button in the left sidebar of your Fern CRM account.)