How can we help?
How To Add An Unsubscribe Link To Emails
Unsubscribe links are crucial to keeping your email reputation clean.
Emails without an unsubscribe link violate email regulations and break Google and Yahoo’s terms for emails sent to their users. (If you’re interested in the details, read more about the legal requirements, fines, and impact on your email reputation here – https://help.ferncrm.com/articles/importance-of-unsubscribe-link/)
And if your contacts can’t find the link to unsubscribe, they’re very likely to report it as spam to make it go away and if your account gets too many complaints, your email engine will suspend your account. It can get super messy and add unnecessary stress and extra work when it’s such an easy thing to avoid.
There are THREE different ways to add unsubscribe links to your emails.
No matter how complex your business is, we recommend starting with option 1 TODAY so you can start sending and replying to emails right away. You’ll definitely need this in place before adding your existing email list to Fern CRM.
Then switch to option 2 as soon as you start adding emails to workflows or sending out bulk emails like newsletters or marketing emails. (So you can add the shortcode into those emails from the start instead of having to go back and edit all of them later.)
As for option 3, not every business needs it. So if you’re happy with option 2, don’t feel like you need to add option 3 to your process.
Let’s briefly look at all 3 and then dive into the details.
3 Options from easiest to hardest
Option 1 is the easiest because all you have to do is open your settings, check a box, and edit one sentence. The system will automatically add the sentence with the unsubscribe link to the bottom of every email sent.
Option 2 is almost as easy, but with extra steps. You’ll create a trigger link for the unsubscribe link and add it to the email signature for you and every team member. You’ll create one workflow to enable DND (do not disturb) for email whenever that trigger link is clicked. Then, you’ll add the custom value for the email signature to the bottom of every automated email, every marketing email, etc. The system will automatically include your email signature when emailing from the omnichannel inbox.
Option 3 starts with implementing option 2, then adding more layers on top. You’ll create a landing page with a form for email subscribers to fill out so they can choose whether they want to unsubscribe from everything and be removed from your list or if they want to change how often they get emails or which topics they receive emails about. Workflows are needed to add and remove tags as needed based on what they choose. Once everything is set up and ready, you’ll change the unsubscribe link in your email signature and that will update the link everywhere at once.
Option 1 ~ quick and easy unsubscribe link
Enable the global unsubscribe link settings once and every email will be compliant.
Navigate to Settings -> Business info and then scroll down to the “General” section which is near the bottom on the right side of the page:
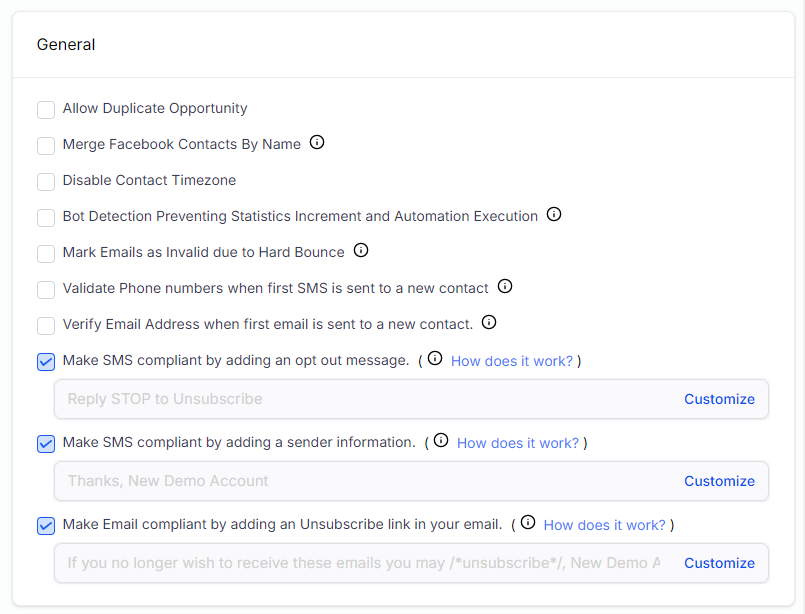
The last option in the General section (at the time this is written) says “Make Email compliant by adding an Unsubscribe link in your email.”
Make sure that box is check marked (to enable these settings.)
Next, click the word “Customize” which will open a pop up window like this:
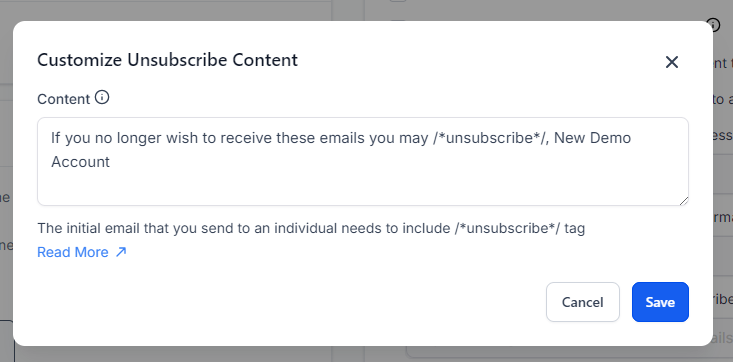
Edit the sentence inside the text box to change the unsubscribe language to whatever you want, making sure to keep the “/*unsubscribe*/” in your message. That word, with the asterisks and forward slashes is the shortcode that’s going to turn into a link for them to unsubscribe. Without it, this setting is useless!
Option 2 ~ a simple unsubscribe automation/funnel
Once you have option 1 in place and you’re ready for something more advanced, you can take your unsubscribe experience to the next level with option 2. With option 2, your email readers will see an unsubscribe message and link at the bottom of every email. If they click the link, it opens a landing page that lets them know they’ve been unsubscribed while the automations take care of the rest.
We’re planning to create a template you can add to your Fern CRM account that sets all this up for you (and you just need to customize it.) It will be available starting in September 2024. But we’ll also leave these steps here for anyone who wants to create their own from scratch or understand how it works.
Read through all the steps to make sure this is something you want to create, then open your Fern CRM account to follow along.
Step 1: create a landing page (as simple or engaging as you wish) that subscribers will land on after clicking the unsubscribe link.
Step 2: create a trigger link that will kick off a workflow when your email subscriber clicks it.
Step 3: create a workflow to perform the unsubscribe actions, such as enabling DND (do not disturb) for email, adding any tags you want to add, removing any tags, etc. to ensure that contact stops getting your emails asap.
Step 4: add that trigger link to your email signature in the Settings, along with whatever wording you want to use (and make sure everyone using your account to engage with contacts adds it to theirs as well!) Some countries also require you to include your business mailing address at the bottom of every email, so this would be a great time to add that and any other legal requirements.
Step 5: add the custom value for “user email signature” in every workflow email, newsletter, bulk email, etc. and make sure contacts are either “assigned to a user” (a workflow action) with the trigger link in their signature when the contact is first created or assign them to a user in every workflow with an email action. (The system automatically includes the user’s email signature at the bottom of every email sent from the omnichannel inbox.
If that sounds like the kind of unsubscribe experience you want to create, let’s dive into the details:
Step 1 Landing Page
Go to the main side of your dashboard and go to the Sites section. Create a new funnel or add a landing page to any existing funnel. (You’ll need to publish the funnel to a domain, so all the steps will be published in order for this page to work.) Design your page however you like. This is the page they’ll see after they click the button to unsubscribe so make sure it clearly states that their request has been granted (in your own words of course!)
Once you’ve published the landing page, grab the URL and head over to the Marketing section.
Step 2 Trigger Link
Inside Marketing, choose Trigger Links from the top menu bar, choose Links from the dropdown menu and then click the blue button that says, “Add Link.”
Enter the word or phrase you want to be hyperlinked (typically just “unsubscribe”) and the URL of the landing page you just created and click the Save button.
Step 3 Workflow
Now, go to the Automations section and create a new workflow from scratch. For the workflow trigger, choose “Trigger Link Clicked” (you can type it in the search box and it will come right up.)
For the actions, make sure to Enable DND using the Enable/Disable DND action. Add a filter to the DND action that specifies email only.
At this point, add any actions that fit your situation. If your email list is based on contacts with a specific tag, then add an action to this workflow to remove that tag. If you want to add a tag called “unsubscribed” so you know that’s why they’ve been marked DND, then use the “Add Tag” action. If you need to remove them from any workflows (like your newsletter workflow or holiday promotions workflow) then add an action for that too. Add as many actions as needed to successfully unsubscribe them and ensure they don’t keep receiving emails from you.
Save your workflow. Pop into the settings and make sure contacts can re-enter more than once. When you’re completely finished, publish the workflow.
Step 4 Email Signature
Next, switch over to the Settings side of your Fern CRM account, choose My Staff in the left sidebar, and click the pencil to edit your user profile.
Scroll down to the editing box for your user signature and add the unsubscribe message and link. Make sure to use the trigger link, not the actual URL of the landing page. (You can enter it into your email signature by clicking the chain/link icon and then clicking the tag icon in the link editor. Or go back to Trigger Links and copy the link to paste into the URL box.)
Add any other email footer info you need to make your emails compliant and on-brand.
Make sure your other “Staff” adds the same content to their email signatures too.
Step 5 Add Custom Value To Emails
Now, whenever you’re adding an email to a workflow, add an action above the email to “Assign To User” and assign it to someone with the unsubscribe language in their email signature. This will let the automations know whose email signature to grab when sending the email to your contact.
Next, add the custom value for “user signature” to the bottom of every workflow email:
{{user.email_signature}}
This will add the entire email signature for the Assigned User to the bottom of the email.
Add custom value shortcode to any/all emails being sent from your Fern CRM account.
When you’re done, send yourself a test email and double check that the email signature shows up correctly at the bottom of the email, and click the link to make sure it opens the correct landing page. Last, check the execution logs of the workflow (or the contact profile for your test contact) to make sure DND was enabled, that the right tags were added/removed, etc.
Option 3 ~ an unsubscribe funnel with options
Option 3 has even more steps than Option 2, so we’ll add it to its own article and link it here in the future.