How can we help?
DIY Setup ~ Setting Up Your Client Portal, Courses, Communities
In Fern CRM, your courses, communities, client portal, affiliate manager, and your members’ account info all live in one place collectively called the “Client Portal.”
You’re already familiar with Fern’s Client Portal ~ which we refer to as the “Action Center.” When you log into the Action Center, you’re logging into our courses, communities, and your Account Info (billing, profile, etc.)
Your Client Portal will be on a subdomain of your existing site (or you can give it its own domain if you prefer.) Either way, it has to have its own domain/subdomain where nothing else already exists. (If something else is there currently, you’ll lose access to it.)
Meanwhile, think of the “Client Portal” feature as the umbrella for everything on that domain or subdomain. Client Portal is the top layer and everything else ~ courses, communities, certificates, affiliate manager, and more ~ exist within.
For your Client Portal, you’ll decide what your members see when they login:
- If that member has been granted access to any courses, they’ll see a button for courses in the top menu.
- If they’ve been granted access to any of your communities, they’ll see a button for communities in the top menu.
- If they’ve been granted access to your affiliate dashboard, they’ll see a button for it in the top menu.
And you get to decide if they can only see the things they’ve been granted access to or if you want to show them everything, to entice them to collect them all.
ALL members who have been given a login to the Client Portal will be able to see their account info. But again, you get to decide which features are included in their account info. Things like, invoices, contracts, payment methods, and more. You toggle them on and off in the settings.
(We’ll go through the settings for all of this during this customization process.)
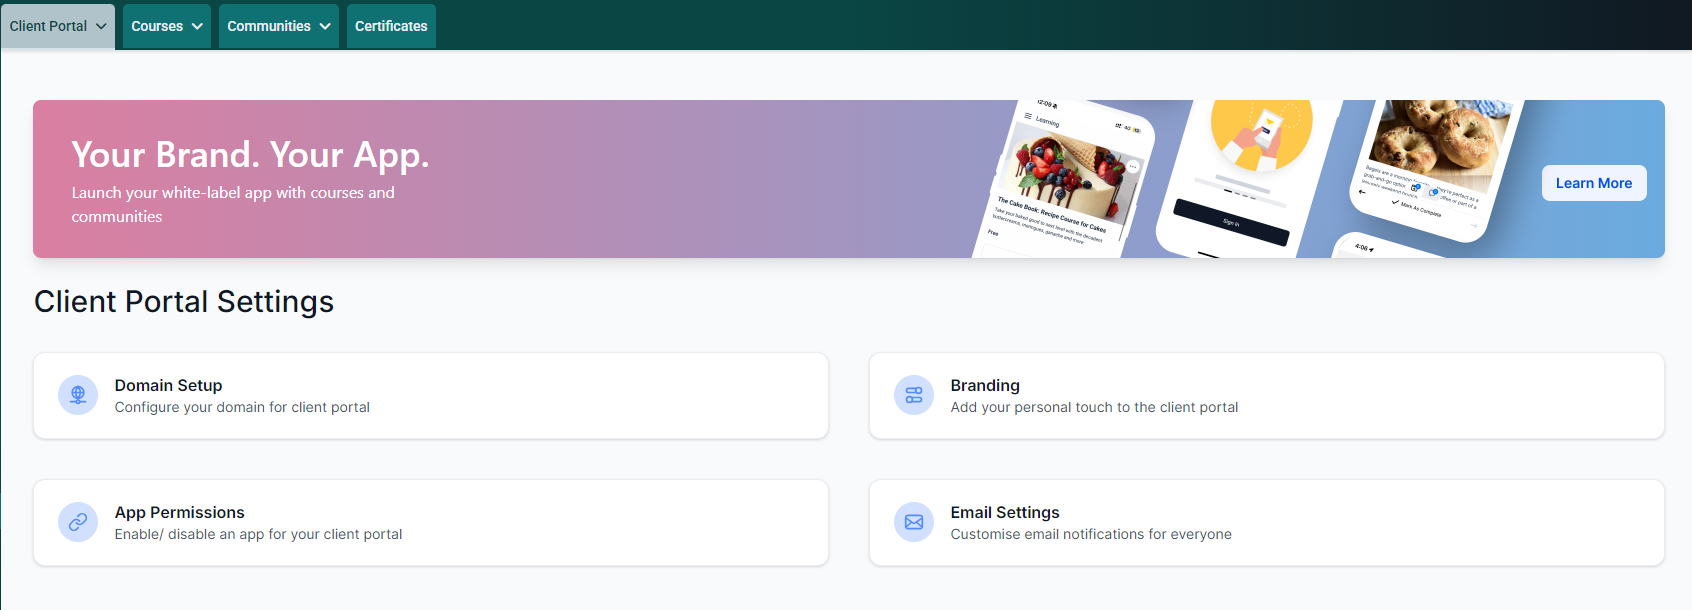
Client Portal Settings
Before we dive into the step-by-step checklist, I want to let you in on a secret/shortcut:
The settings at the “Client Portal” level, apply to the entire Client Portal and everything in it:
- Client Portal Settings ~ whatever you set here, will work throughout the subdomain/domain and will apply to your courses and communities as well.
- Course Platform Settings ~ if left blank, it will use whatever is set in the client portal settings. Or, you can give the course platform its own settings if you want it to stand out and be different from the rest.
- Community Platform Settings ~ this refers to the settings for the community platform as a whole, not the settings for individual groups. If left blank, it will use whatever is set in the client portal settings. Or, you can give the course platform its own settings if you want it to stand out and be different from the rest.
In other words, if you want to save time and effort, add your settings to the Client Portal settings and you don’t have to add them again to the course or community platform settings.
The following steps are included in the Client Portal Checklist where you can check them off as you go: Client Portal Checklist
Click on any image in the Help Docs to embiggen it.
- Open your Fern CRM dashboard and click on “Memberships” in the left sidebar menu. This will take you to the Client Portal dashboard page.
- Click on/hover over the “Client Portal” tab in the top menu and choose “Settings” from the drop down menu.
- On the Settings page, click on “Branding”
- Add the following info and upload the files for:
- Name
- Description
- Primary Brand Color 1
- Secondary Brand Color 2
- Favicon – SVG, PNG, JPG (max 16×16 px)
- Logo – SVG, PNG, JPG (max 200×200 px)
- Support email
- Copyright
- Optional: Portal Image – SVG, PNG, JPG (max 1920×2160 px) See below for notes about Portal Image.
Branding Example
Here’s an example of how each setting is displayed on the login page without a Portal Image:
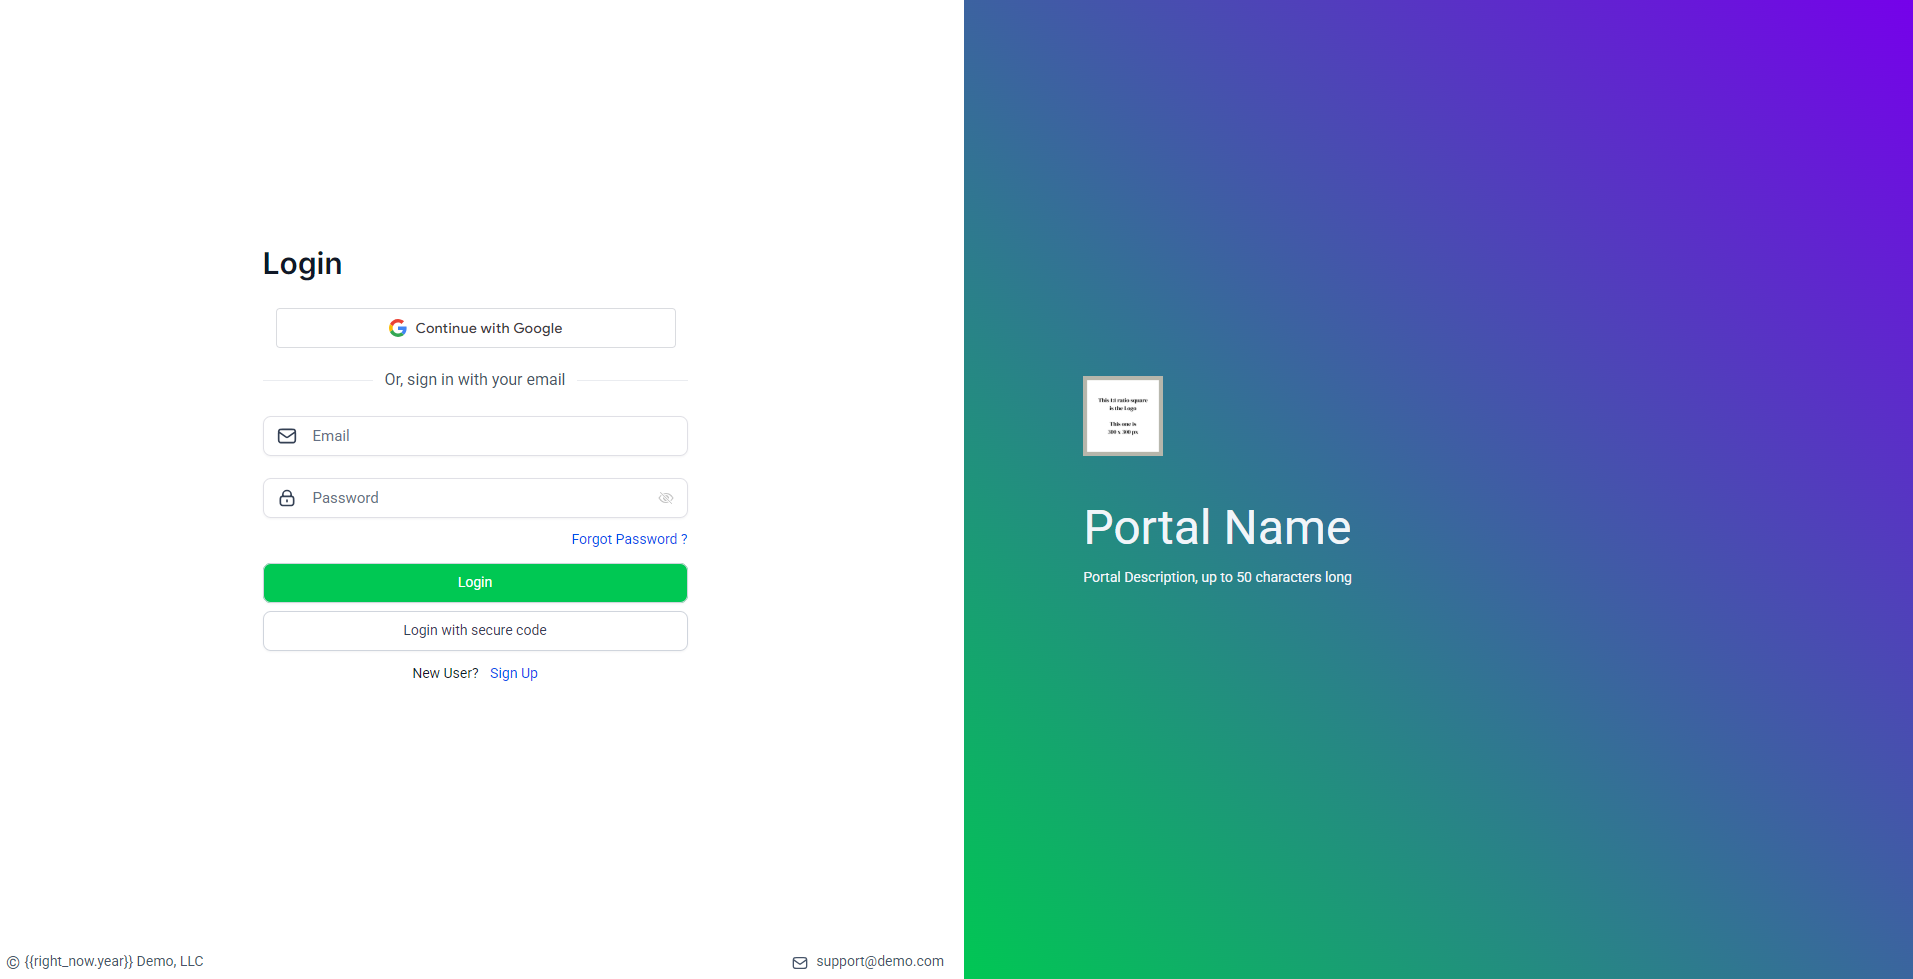
For the example in the screenshot, we used green for Primary Brand Color 1, which shows up as the button color and the bottom left of the gradient background. We used purple as the Secondary Brand Color 2 which shows up as the top right of the gradient background color.
The white square with the tan border and text that’s too small to read is the logo image. Even though we uploaded an image that’s 300×300 px, it shows up at 200×200 px max.
Also, notice how custom values don’t work on this page (just look at the copyright in the bottom left corner) and the links will remain blue unless you change the color via CSS.
Portal Image
If you decide to add a Portal Image, please note that the Portal Name and Description will be in that light grey color that’s almost white. And the Portal Image fills the gradient portion, with your logo, name, and description on top. So make sure your Portal Image isn’t too busy and is dark enough to read the light name and description (and that your logo doesn’t disappear when it’s on top due to your logo being the same colors as the portal image.) (Or use CSS to change the color of the text.)
App Permissions
This is the part where you’ll choose what you want your members to see when they login.
Go back to the Client Portal Settings page:
And this time, choose “App Permissions” to open a page that looks something like this:
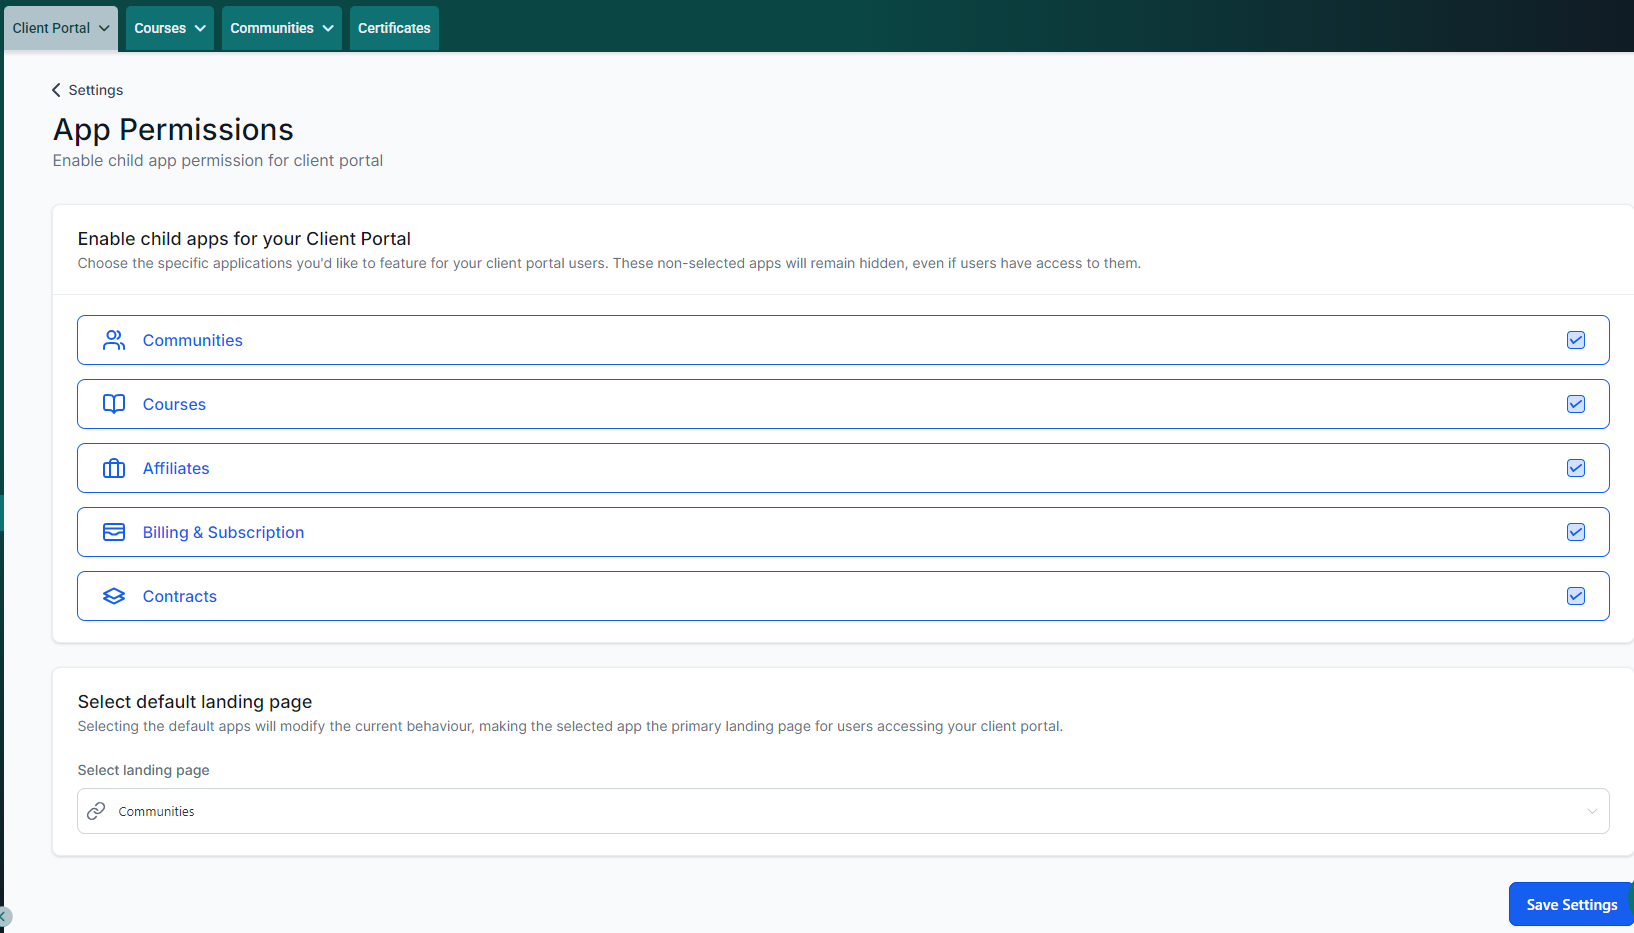
Choose Which Features Members Can See
- In the top section, where it says, “Enable child apps for your Client Portal”, select the features you want your members to have access to when they log in.
If you plan to create courses and give any of your members access to courses, then make sure the “Courses” row has a checkmark.
Same goes for anything else you plan to use.
If your business doesn’t use Contracts, you can remove the checkmark from that option.
And so on.
- When you’re done, hit the [Save Settings] button.
Naturally, you can always come back here later and add more “child apps” after you’ve created something and are ready to show it to your members.
Choose The Default Page
- In the bottom section, choose which page you want users to see immediately after they log in.
Personally, I like them to see the Community first, so they feel motivated to look at updates and maybe engage before diving into things like courses. And also, for those members who login regularly, they’re often coming back for the community when they login. So it’s better for the member experience too.
When you’re done, hit the [Save Settings] button again.
Email Settings
We’re going to skip the email settings for now because they only apply to communities (groups), courses, and certificates. So, we’ll include the email settings in the checklists for courses and communities, as relevant.
Connect Your Domain
Right now, your Client Portal is on the default subdomain which is ugly and not brand-friendly.
So let’s go back to the Client Portal Settings page:
- Choose “Domain Setup” and you’ll see a page that looks something like this:
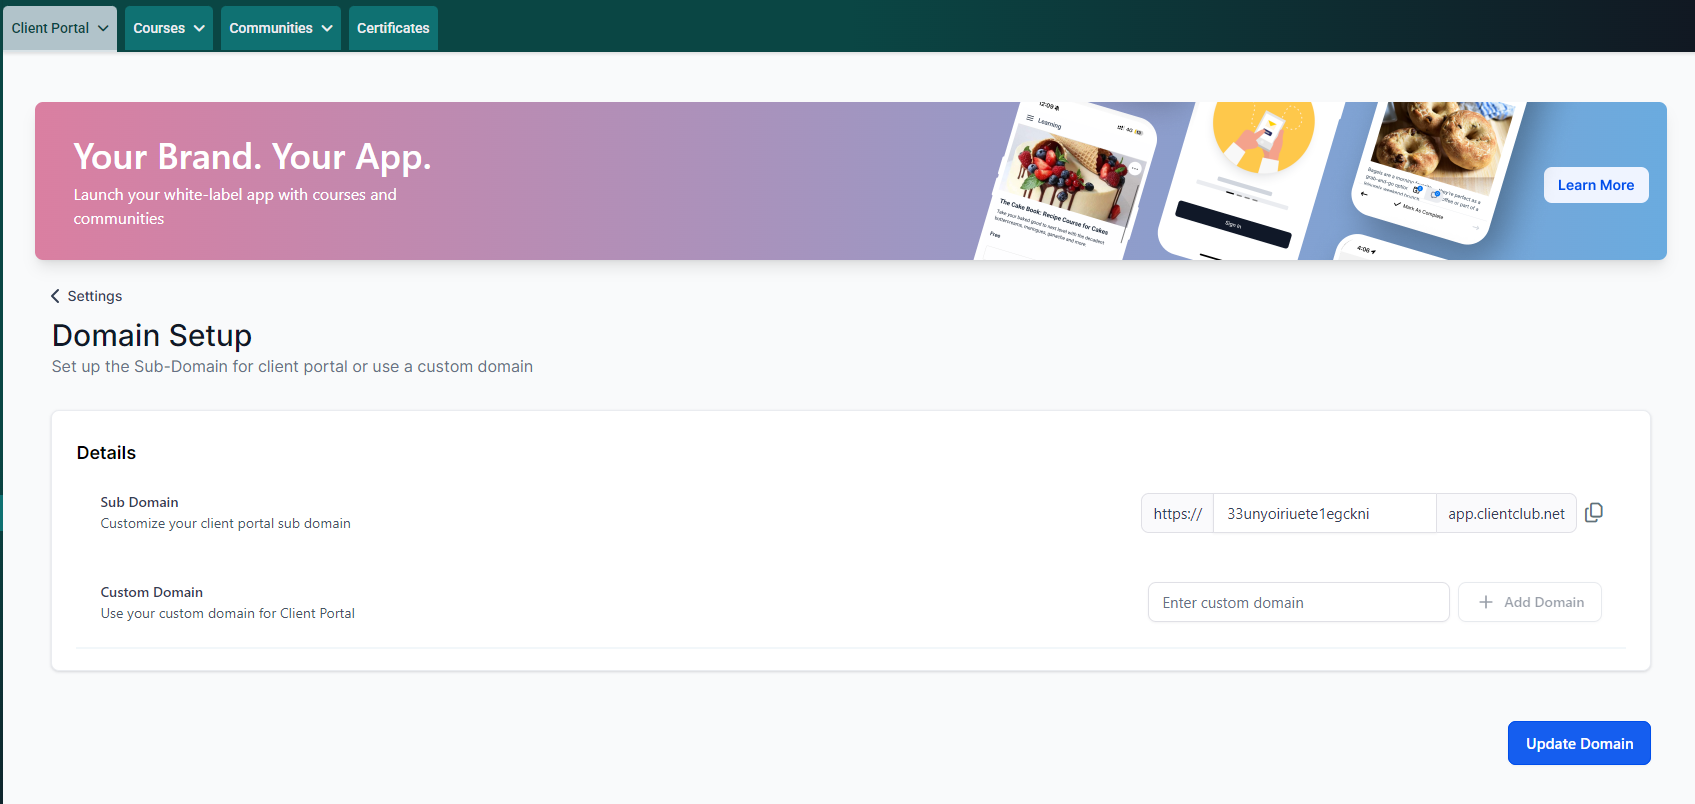
Start by adding your brand name to the “Sub Domain” option, just to reserve that URL for yourself and prevent others from using it.
But we’re not actually going to use that URL because “app.clientclub.net” isn’t going to build trust in your brand!
Instead, we’re going to add your Client Portal to a subdomain on your own website.
Your DNS Records
If this is the first time you’re connecting a domain or subdomain to your Fern CRM account, then you’ll need to open the tool where your DNS records are located and add a new record.
If you have no idea what I’m talking about, don’t worry, the system built into Fern CRM makes it pretty smooth and easy.
If you’re familiar with DNS records and where yours are located, then you’ll also be fine. We’re going to add a CNAME record for the subdomain you want to put your Client Portal on.
Add Your Custom Domain
- Enter the subdomain/domain where you want your Client Portal to exist into the “Custom Domain” box. Don’t include http or https or https:// or any of that stuff. Just phrase.yourdomain.com
Like this:

- Click the [+Add Domain] button
It will open a popup window that looks something like this:
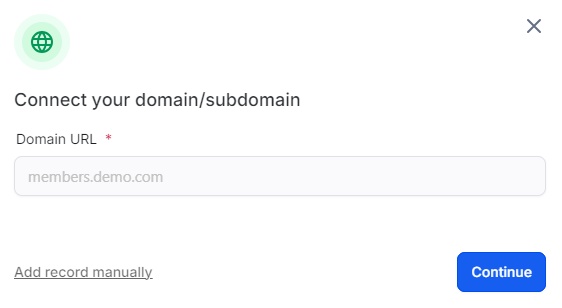
If you prefer easy mode then click the [Continue] button on the right to let Fern CRM detect where your DNS records are located, open a window for you to log into that place, and then add the records for you. It will guide you through the process. (Jump to the Easy Mode section below this.)
If you prefer to open a new tab and log into your DNS place yourself and manually add the records, then click the “Add record manually” link on the left.
Here’s a list of help docs for the most common platforms, including Cloudflare:
- GoDaddy
- Google Domains
- Hostgator
- Hover
- Namecheap
- Squarespace
- AWS
- Cloudflare
- Bluehost
- Hostinger
- InMotionHostwinds
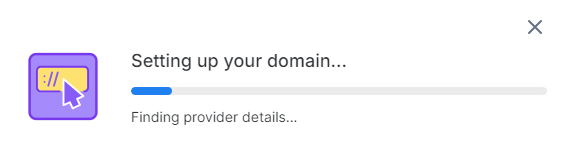
What “Easy Mode” looks like
Once you click the [Continue] button you’ll see the window progress through different stages like this:
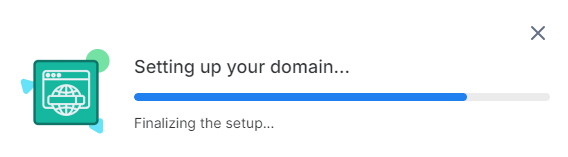
And when it’s done, it will show a window similar to this, but with your DNS tool shown:
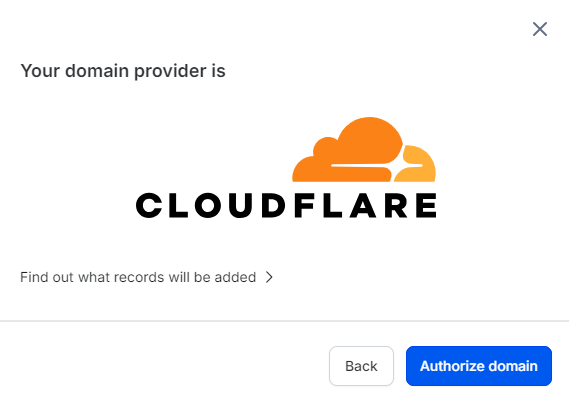
If you click the “Find out what records will be added >” link, it will show the record to be added:
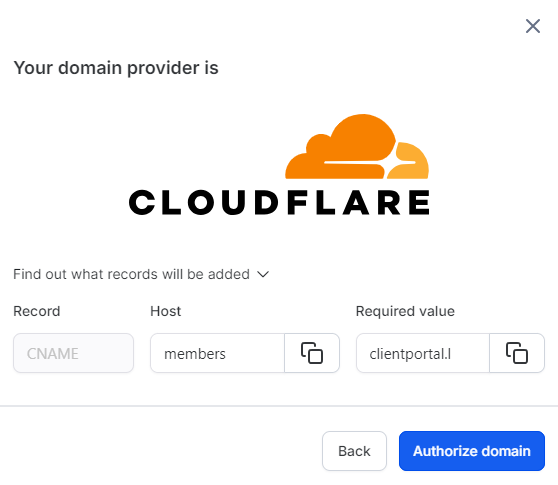
Click the [Authorize domain] button to continue and it will open a new tab/window asking you to log into that tool (if you’re currently logged out.) You may also have to use your 2FA to get in.

Once you login, it will add the record for you and guide you through the steps to verify your new DNS record is recognizable and working.
If it doesn’t verify right away, give it a minute and try again. Go grab a big glass of water, take deep breaths, have a momentary dance party and then click the [Verify records] button again. I recommend watching this video for a minute before trying again: https://www.youtube.com/watch?v=hkXYMX6ZUTE
If you encounter any issues with either adding the record or verifying it, pop into the Fern community and get help or book a support session with us!
Add Records Manually
If you choose to add records manually, you’ll log into the tool where you manage your DNS records and create the new CNAME record yourself. (See above for links to the help docs for a variety of different tools.)
Once you’re logged in, click the link to add a new record and choose CNAME record.
For the “host” or “name” you’ll add the phrase you chose for your subdomain. (Just the word/phrase. No punctuation and not the full URL. In our example we’d add just the word “members” with no quotation marks.)
For the “value” you’ll copy what it shows in the Fern CRM window by clicking the double squares overlaid on top of each other (the “copy” button) and paste it into your DNS record field:
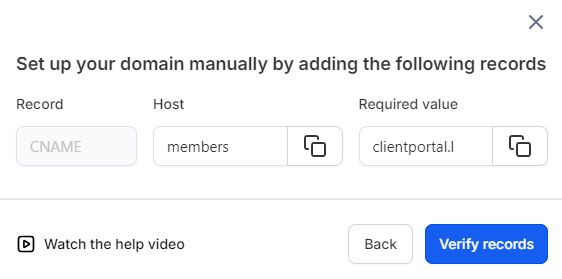
Once you’ve added the record in your DNS settings and saved it, pop back to Fern CRM and click that [Verify records] button on the bottom right.
If it doesn’t verify right away, give it a minute and try again. Go grab a big glass of water, take deep breaths, have a momentary dance party and then click the [Verify records] button again. I recommend watching this video for a minute before trying again: https://www.youtube.com/watch?v=hkXYMX6ZUTE
Next Steps
If you’re planning to use the Client Portal as just that, a client portal, where your buyers can log in and change their own payment method, see their invoices, and access their account info, then you’re done!
On the other hand, if you want to offer any of the following:
- Courses (even if it’s a welcome hub for your clients)
- Communities (a private support channel for each of your 1:1 clients, a free group for your whole audience, or anything in between)
- An affiliate program where your members can see their links and a dashboard of their results
Then keep working through the related Help Docs to set up the things you want to use
Search the Help Docs or ask questions in the Brain Trust Community.