How can we help?
DIY Setup Step 1 ~ Your Business Profile Settings
Logging into your Fern CRM dashboard for the first time can be overwhelming, kind of like sitting in the cockpit of a spaceship or racecar for the first time.
I mean, what the heck do all those buttons do?????
So let’s tame the overwhelm a bit with some basic setup steps.
The first thing we’ll do is fill out your biz info which will set up your whole CRM account for success and Mollie will sleep better tonight, knowing that the most important stuff is taken care of.
Then, we’ll create your first user ~ you! And show you how to make your CRM dashboard easier to navigate until you get comfy with the basics.
Step 1 ~ Go To The Settings Side Of Your Account
There are 2 sides to every Fern CRM account. The “Main” side where you’ll spend most of your time and the “Settings” side where you’ll pop in and change the settings as needed.
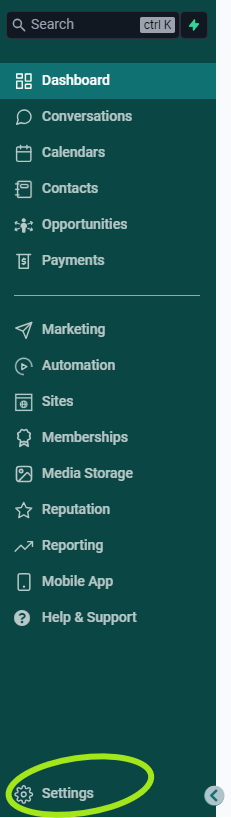
When you first log into your account, you’ll be in the “Main” dashboard. Look at the sidebar on the left side of the page. Depending on your screen size, the sidebar might be expanded or collapsed. You can open it/expand it by clicking on the > inside the O button in the bottom left corner. It looks like this:

Notice how the current tab is highlighted in green in the sidebar. This is a sign that you’re on the “Main” side of your dashboard.
Whether the sidebar is expanded or not, you can click on the “Settings” link at the very bottom of the left sidebar by clicking on the gear icon (when the sidebar is collapsed) or the word “Settings” (when the sidebar is expanded).
Once you click on the Settings link, the sidebar will change to look like this at the top:

Notice the “Go Back” button that appears at the top of the sidebar now that we’re on the Settings side.
Also, the sidebar link for the page you’re on is highlighted in black now instead of green. This is a sign that you’re on the Settings side of your dashboard.
Use the slider on the image comparison tool below and slide it all the way to the left to see the difference between the sidebar on the “main” side (the image on the left/top where the sidebar links are highlighted in a teal green) and the “settings” side (the image on the right/underneath where the sidebar links are highlighted in black.)


Step 2 ~ Edit Your Business Profile Settings
You’re probably already on the “Business Profile” page now, but if not, click that link in the left sidebar to go to it.
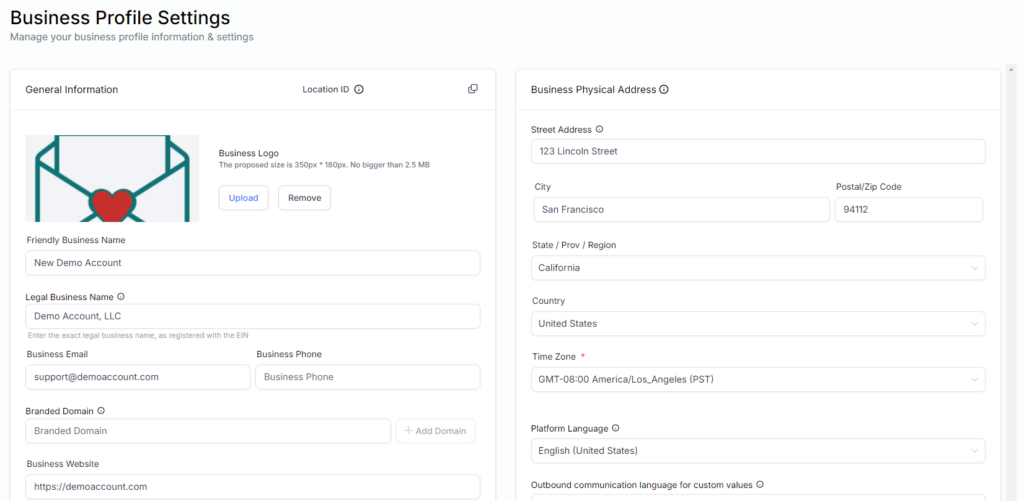
Start by adding your “Business Logo.” Click the “Upload” button at the top left of the page and choose the file from your computer. (If you uploaded your logo during the scavenger hunt, you still need to upload it here.)
This is the official location of your logo and this is the image that will show up in our pre-built templates, the “custom field” (shortcode) for the business logo, and more. (The logo upload during the scavenger hunt was just to show you how useful Custom Values are. You’ll have a chance to delete that version later if you like, but it won’t be used anywhere else other than the scavenger hunt page.)
The “Friendly Business Name” is what will appear at the top of your left sidebar anytime you’re logged into your Fern CRM account:

(It’s also the name used in the default unsubscribe language unless/until you customize the language.)
If you use any of our pre-built templates, we use “custom fields” which are like shortcodes that display whatever is entered into the associated boxes in your account. So make sure the box for your “Legal Business Name” is accurate (for example, include the LLC if it’s registered as an LLC) and that the “Friendly Business Name” is what your audience will recognize (such as your DBA name or your own name.)
Business Address
If your business has an EIN with the IRS in the U.S., then enter the address that’s on your EIN paperwork. The title on the settings page says “Business Physical Address” but in some cases, the address the IRS has on file for you may be different than your physical address. So use the one on your EIN paperwork.
There are some features in Fern CRM that use the address entered here, for example creating and sending invoices. But of course you can always come back and change it once you see where it’s being used.
Time Zone Settings
While you’re there, choose the correct Time Zone from the dropdown menu on the right of the page (directly below the Business Address fields.)
Each user in your account will set their own time zone in their user profile, so change this setting to the time zone your business headquarters or owner operates out of.
This is the default timezone Fern CRM will use for things like workflows, scheduled emails, and more. But most features also give you the option to time things according to your contact’s time zone too, if that’s desired. So it’s not set in stone. You just want to make sure that most things align with where you, the business owner, is located.
Step 3 ~ General Settings For FTC Compliance
Add or change as much of the info on your Business Profile Settings page as you wish. When you’re ready, scroll to the section labeled “General Settings” and let’s make sure your account is compliant:
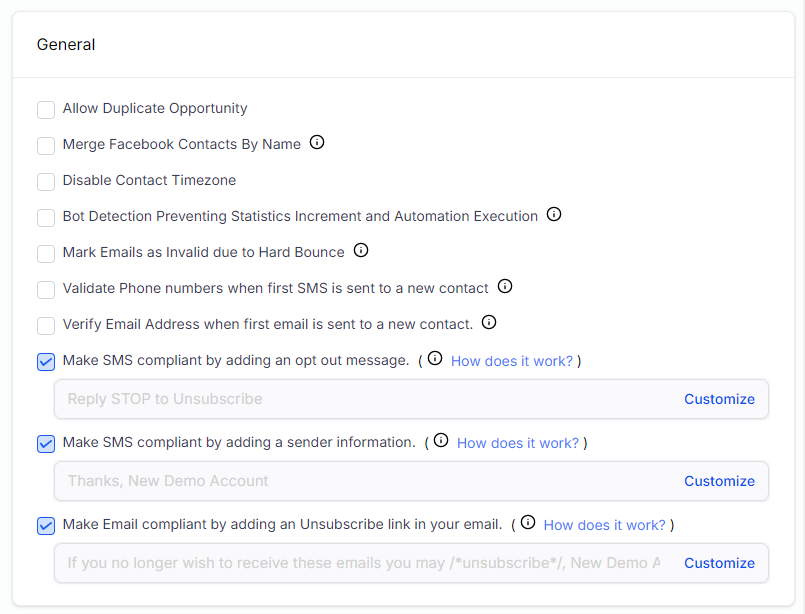
Even if you don’t plan to send any text messages or emails from your Fern CRM account, make sure those last 3 checkboxes are checked just in case a text or email accidentally slips out. You might forget and use the “Send Test Email” feature or your VA might accidentally send an email instead of a DM.
You can see a preview of the default wording in a light font color in the box below the checkbox info. If you want to see the rest of the wording or change it to be more accurate or match your brand voice, click the blue “Customize” link to the right of the one you want to see/edit. A pop up window will open that looks something like this:

If you’re happy with what it says, click the “Cancel” button on the left. If you make any changes, click the blue “Save” button on the right. If you make any changes, make sure to keep the /*unsubscribe*/ exactly as it is. Do not remove the slashes or asterisks or change the word at all. Otherwise it will break the code that turns that word into a clickable link which will make it impossible for people to unsubscribe.
Sending emails and/or text messages without the proper unsubscribe options (including a clickable link in emails) will result in your business being in violation of the FTC regulations and the Terms & Conditions you agreed to when you signed up for Fern CRM.
Missed Call Text Back
This feature is totally optional and won’t work until/unless you sign up for or connect your business phone number. If you know for sure you won’t want to send a text when someone calls your business number and no one answers, then uncheck it now. Otherwise, it doesn’t make a difference until you start using your business phone number with Fern CRM. (No incoming calls means no text will be sent.)
Next Steps ~ Create Your User Profile
Now you’re ready to create your own user profile and we’ll show you how to use that profile to tame the overwhelm of having too many features in your dashboard and not being familiar with the navigation yet.
Click over to this page to continue:
Getting Started 2 ~ Create Your User Profile