How can we help?
DIY Setup ~ Accepting Payments
Fern CRM plays nicely with a handful of different payment processors including Paypal, Stripe, and Square. This article is going to show you how to connect your Fern CRM account to Stripe to get started.
(If you’d rather add a different payment option, search the Help Docs for the one you want. If you still don’t see the one you want listed here, get in touch and we’ll send you links to more info.)
Fern CRM has numerous different ways to accept payments, including invoices, checkout pages, point-of-sale, payment links, and more. This article will talk briefly about the features and then link to other Help Docs that go deeper into the specifics of each one. That way you can focus on the methods that make the most sense for your business without getting bogged down in too much information.
FAQ ~ Should you set up payments and start making sales before you’ve set up your Fern CRM account for email or text?
Answer ~ We’re big supporters of delivering a delightful experience without making your buyer open an email, so YES it can be done! For example, you can set up your Stripe/Paypal account to send the receipt instead of you and you can give your buyer access to the thing they bought right on the Thank You/Order Confirmation page.
If you’d rather set up your Fern CRM email services before accepting payments, then jump to “DIY Setup ~ Your Fern CRM Email Engine” [link coming soon!] or book a 1:1 with us. (We also help you set up your Email Engine during your Account Setup Session. Be sure to book that if you haven’t already!)
Payment Features
Depending on your business model, you might use some or all of the payment features:
- Invoices
- Sales funnel checkout forms/pages
- Order bumps and upsells
- Online store with cart checkout process
- Payment links via email, text, and/or DM
- Online course checkout page
- Proposals/Estimates
- Affiliate sales links
- Coupon codes
With Fern CRM, you can accept payments for:
- A one time payment
- Monthly payments
- Pay in installments
- Subscriptions
- Services
- Digital products
- Online courses
- Memberships/communities
- Physical products
- And more
At this time, the following Payment Processors can be integrated with Fern CRM:
- Paypal
- Stripe
- Square
- Authorize.net
- NMI
- Klarna
- Afterpay
- Razorpay
- and many, many more
For a full list of what’s available, open your Fern CRM account and click “Payments” in the left sidebar. Then, look in the top menu bar and click “Integrations.” Scroll down to the bottom of the list and click the button that says, “Search For More” and it will show you the full list.
How To Connect Your Stripe Account
Start by logging into your Stripe account in the same browser you’ll use to open and connect your Fern CRM account. If you have 2FA enabled, you’ll need to enter your code, probably answer a Captcha question, and all the other security features.
Next, log into your Fern CRM account and (from the “Main” side of your account) go to Payments in the left sidebar.
From there, choose Integrations in the top menu:
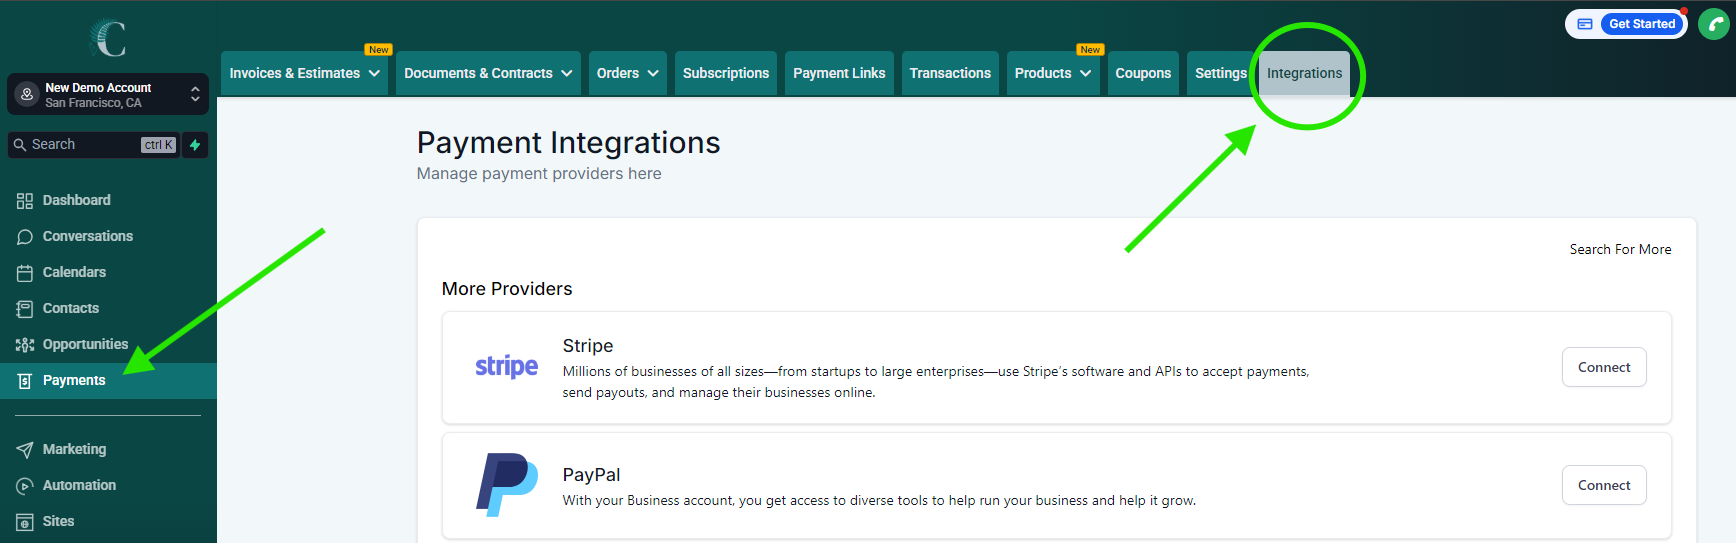
Find Stripe in the list of Providers and click the “Connect” button.
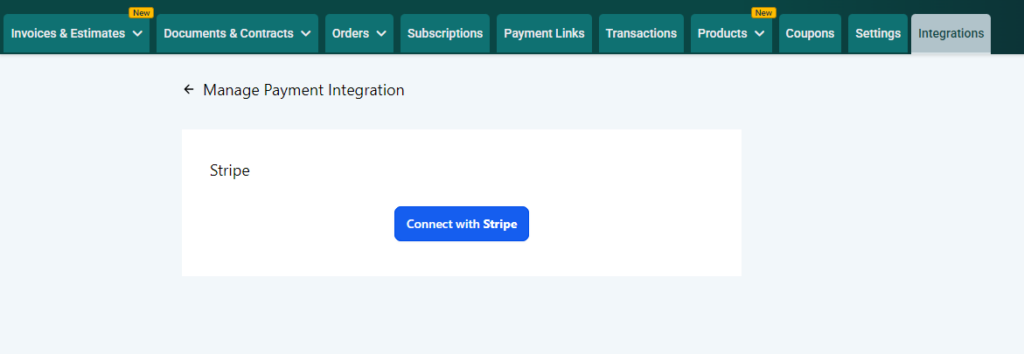
You may see an intermediary page like this, if so, click the blue “Connect with Stripe” button to continue:
This will open a new page in a new tab or window that looks like this:
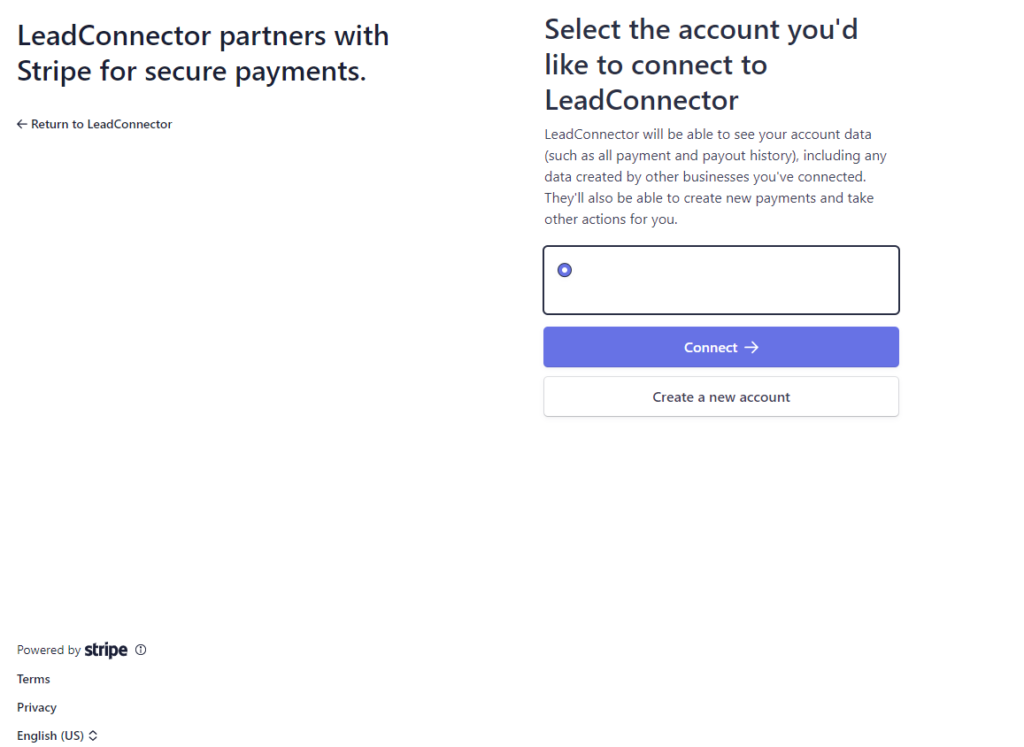
The account name has been removed from the screenshot for privacy reasons, but yours should show your account name in the white box with the black outline. In most cases, you’ll only see one option and it’s already selected which is indicated by the purple circle on the left of the box next to your account name.
If everything looks right (and you have the proper authority to grant this access, i.e. you’re the account owner), click the blue-ish purple button that says “Connect”.
If you weren’t already logged into Stripe when you started this process, you might see this screen instead:
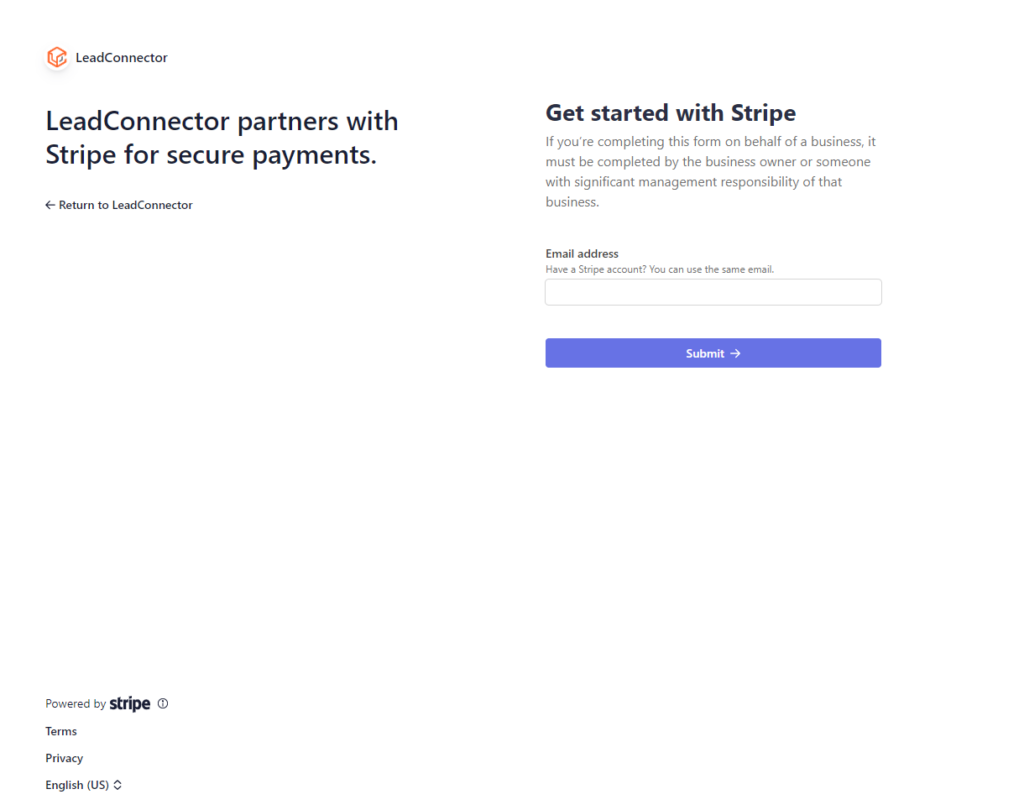
If that’s the case, enter the email you use to log into Stripe and click the “Submit” button. The next page you see will ask you to log into your Stripe account using whatever email you enter here. So if it’s not the email you use to log into Stripe, you’ll have to come back here and change it. (It’s not editable on the next screen.)
Once you’re logged into Stripe and you’ve selected the account you want to connect, this Lead Connector page will likely disappear and leave you wondering if it worked. 🙄
Chances are it did. And if you go back to the tab/window where your Fern CRM account is waiting and navigate back to the Integrations tab on the Payments page, you should see that your Stripe setting now has a button called “Manage” instead of “Connect” and it’s now at the top of the page under “Default” instead of lumped into “More Providers” with the others you haven’t connected:

That’s it! Your Stripe account is connected to Fern CRM and you’re ready to accept payments. If you click the “Manage” button, it will take you to a page that looks something like this:
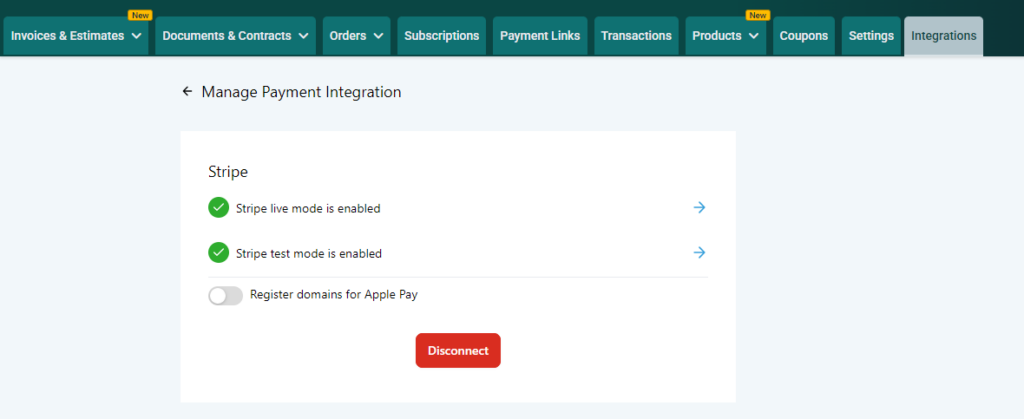
OPTIONAL: If you’re interested in registering your domains with Apple Pay so you can accept that as a form of payment, toggle the switch and follow the prompts. Turning the switch on will lead to a confirmation window that looks something like this:
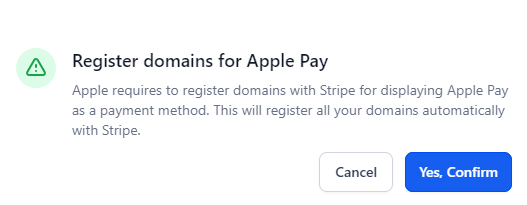
Click “Yes, Confirm” to agree and continue the process or “Cancel” to stop and close this window.
Create A Product In Fern CRM
The easiest way to accept payments in Fern CRM (no matter which format you use ~ checkout forms, invoices, payment links, or other) is to create a product inside Fern CRM and then attach that to whatever format you use to request payment.
For example, if you use checkout pages, you’ll attach the product to the checkout page and the name and price will show up on the checkout form. If you use invoices, you’ll attach the product to the invoice and it will display the name and price on the invoice. If you want to change the price for different clients, you can edit the price before sending the invoice. Likewise, your clients can pay the full amount or a partial payment, depending on your settings and what you agreed to.
So let’s create a product for the thing you want to sell.
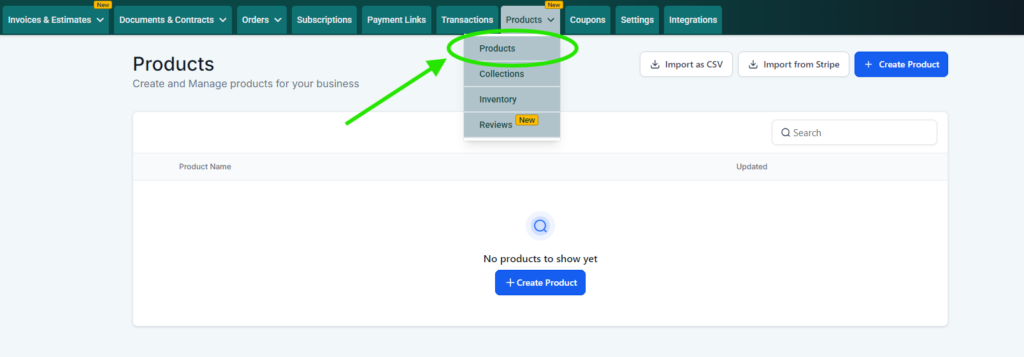
From the Payments page, click on/hover over the “Products” tab in the top menu and choose “Products” from the drop down menu that appears:
From there, click on the blue button in the top left that says [+Create Product]. It will open a new page that looks something like this:

Fill out as much of the info as you want about your product. The ones with a red asterisk next to them are required and are the minimum you need to continue.
As you scroll down the page, you’ll notice the highlighted bit on the left side of the page changes to reflect which section you’re looking at. You can also click on the links on the left side to jump to that section:
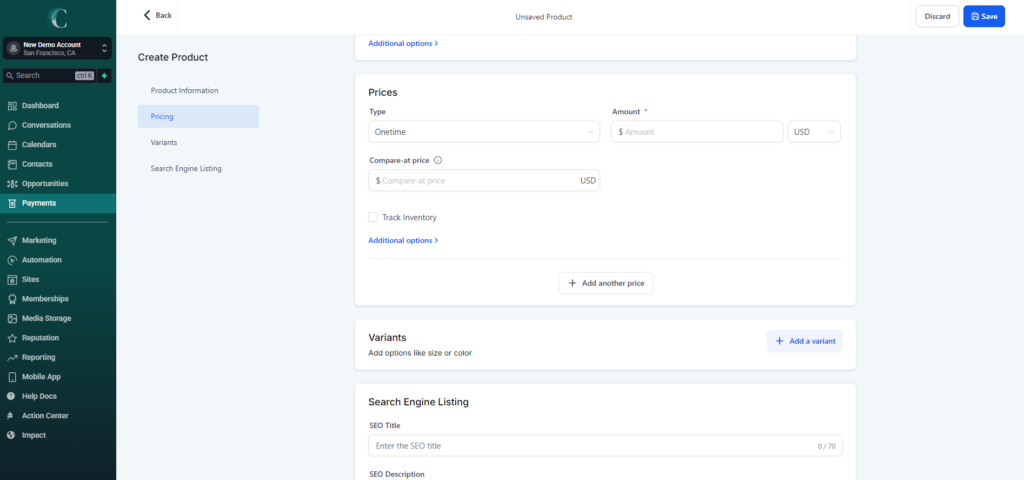
In the Pricing section you have the option to change USD to any other currency that’s supported.
Offering Paid In Full And Payment Plans
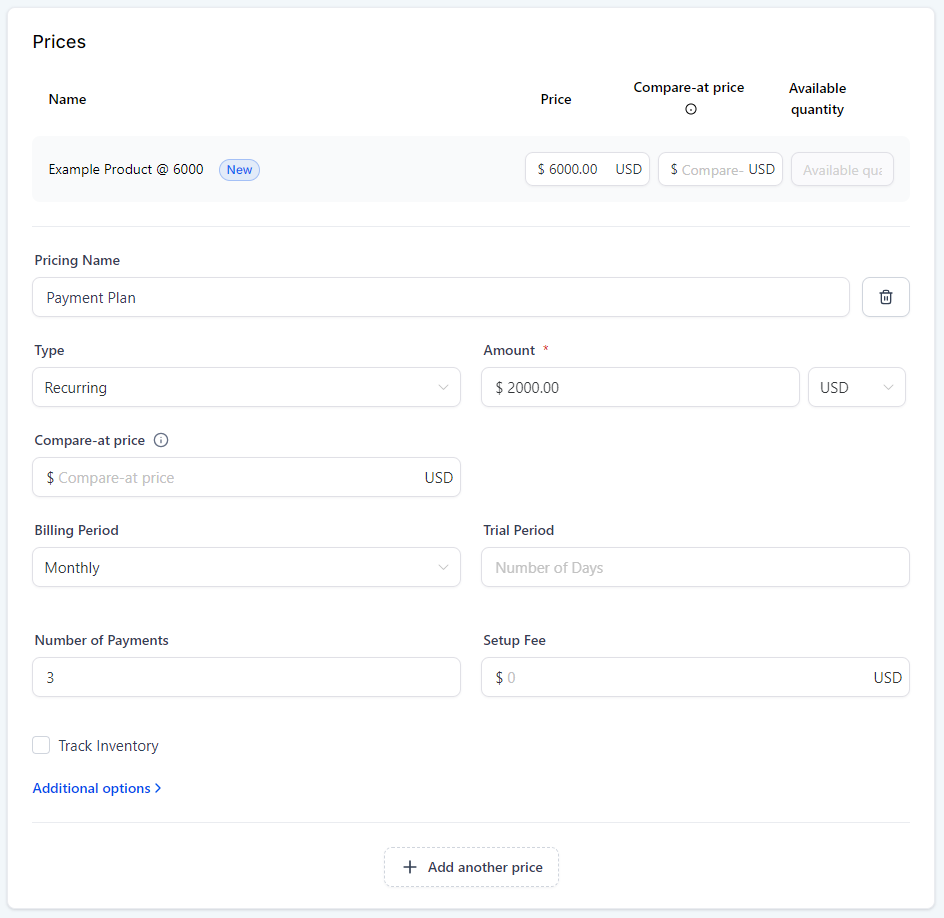
If you want to give your buyers different payment options ~ for example, if you sell the same offer as a one-time price paid in full or a payment plan that splits the price into 3 payments ~ then start by filling out the first price you want to display.
When you’re done, click on the button that says, “+Add another price” and fill out the fields with the information for the second option.
For example, here’s what it looks like with one option to pay $6000 in full or split it into 3 monthly payments of $2000 each:
Offering the same product in different currencies
Likewise, if you want to offer the same product, but you want to offer it in different currencies (instead of letting Stripe handle the conversion), you can do that too.
For example, maybe you want to change the price if they’re going to pay in other currencies because you lose money in the transaction if you don’t. Or maybe you’ve included shipping in the price and you need to charge more if it needs shipped out of country.
To do that, follow the same steps as above to “Add another price”. But instead of choosing different billing periods and number of payments, change the price and currency each time.
Save Your Product
When you’ve filled out everything you want to fill out, hit the blue Save button. There’s a Save button that stays at the top right of the page, no matter which section you’re on. And there’s another one at the bottom right of the page if you scroll all the way down. Both buttons work!
After you click the Save button, it will stay on this page but you’ll see new things appear like the timestamp of when the product was created etc.
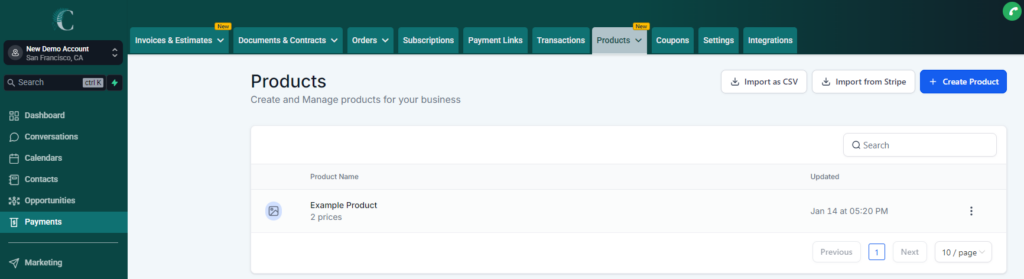
When you return to the Products tab in your Payments page, you’ll see your products listed like this:
If you click on the 3 vertical dots next to the “Updated” date, a new menu will appear with “Edit” or “Delete”. Click Edit to return to the page where you entered the Product info. Click Delete to delete this product (which will delete both price options.) If you want to delete one of the price options, but not the product itself, click Edit and delete the price option from inside there.
Create A Payment Link
The fastest way to start collecting payments is to create a payment link that you can send via email, text, DM, or anything else.
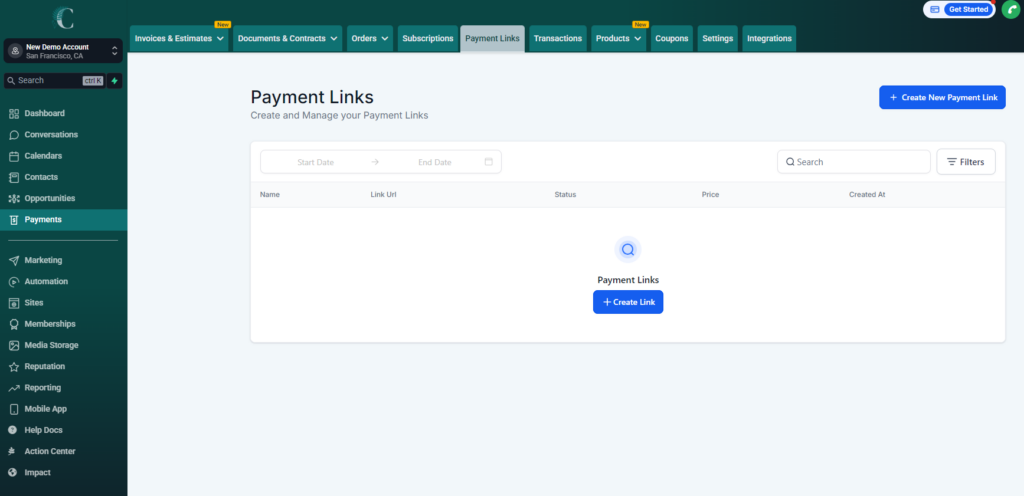
In the “main” side of your CRM account, click on “Payments” in the left sidebar and then click the “Payment Links” tab in the top menu bar. It will take you to a page that looks like this:
Click the “+ Create New Payment Link” button in the top right to create your link. (The button in the middle of the page works too, it will disappear after you create your first link.) It will take you to a new page that looks like this:
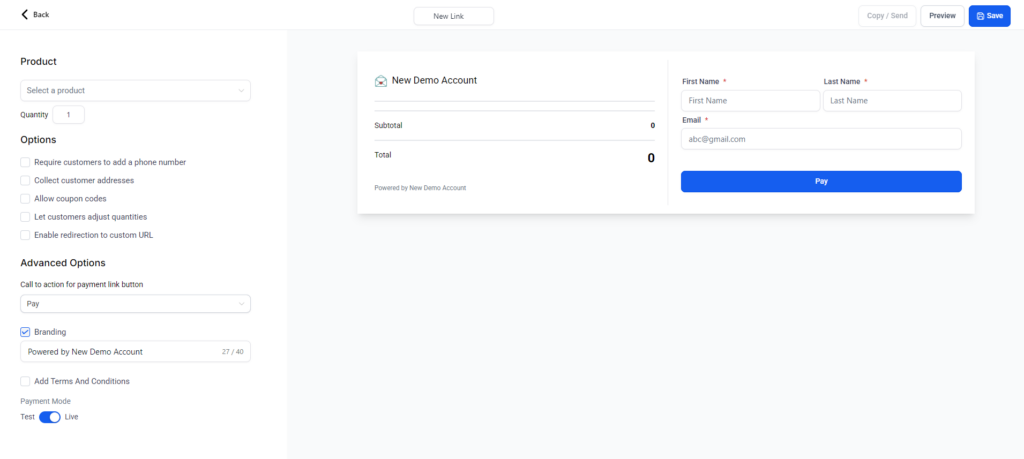
Fill out any of the options you want to use. Start by clicking on the dropdown menu in the top left to select the product you just created and it will change the form on the right accordingly:
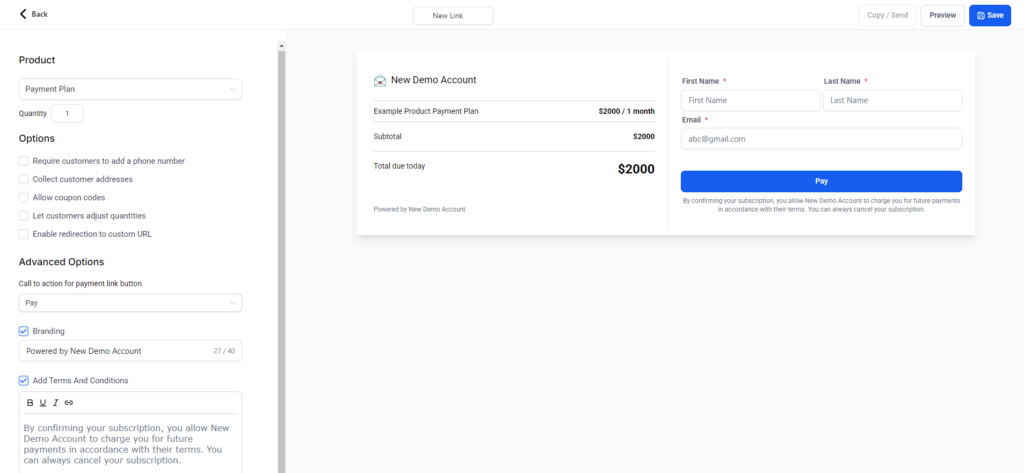
You can only choose one price per payment link for this feature. So if you want to offer different payment options to your leads, then you’ll need to create 2 separate payment links and let them choose which one to use. (If you want to offer both options on a single link, use a checkout page instead. Jump to the next section for how to do that.)
Change any of the language you want to change.
Change the name of the link by clicking on the “New Link” title in the top center of the page and replace it with whatever you want to call it.
Make sure the toggle switch at the bottom left is switched to “Live” (you can see it in the previous screenshot above.)
Clicking the Save button will keep you on this page so you can save as often as you want and keep editing.
You can use the “Preview” button at the top right to see it the way others will see it when you send it to them.
When you’re satisfied, click the “Save” button in the top right and then the “< Back” button in the top left (not your browser’s back button but the button on this page.)
When you’re ready to send this link to someone, open the link editor again and click the “Copy/Send” button in the top right and it will open a popup window like this:
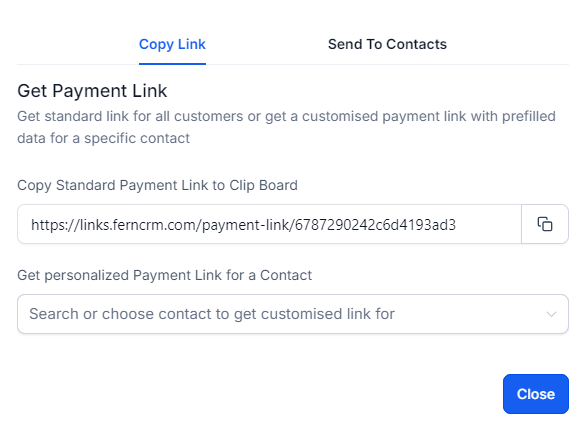
Click on the double square icon on the right to copy the link and paste it wherever you want to use it. Or use the dropdown menu to choose a specific contact to get a customized link for.
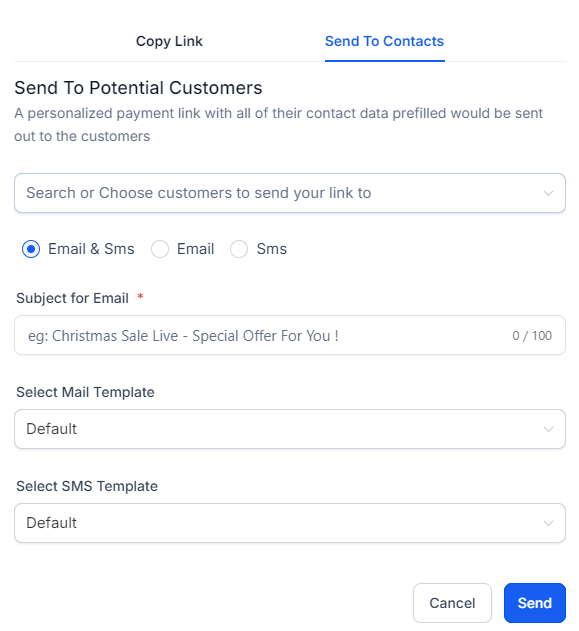
You can also click on the “Send To Contacts” tab at the top right to open additional options:
That’s it! You’re ready to make some money! 🥳🎊
Optional: To Collect Payment Via A Checkout Page, Online Store, Or Invoices
We’ll eventually create Help Docs for each of these (with videos and/or screenshots), but in the meantime, here are the basic steps for each. You can also come to Office Hours for hands-on help.
Checkout pages
Any page in the “Funnels” section can add an order form element to sell a product. Once you’ve added and customized the order form, (make sure it’s set to redirect to a Thank You page!) save the page and then back out to the Funnel Steps.
Make sure the checkout page is highlighted in the list of steps (if not, click on it to make it so), then click on “Products” on the right side. (Between “Overview” and “Publishing.” Once you’re looking at the Products settings for that step, add the product you want to sell and follow the prompts.
Publish the checkout page and thank you page and you’re ready to sell!
Online store
There are 2 places you need to modify the product settings for your online stores: First you need to go into the product itself under “Payments” and toggle the switch for “Include in Online Store.” Once that’s done, it will show up in the list of available products for any store you create.
Next, go to the “Stores” tab inside of [Sites]. Create a store (or click on the store you created) so that you’re looking at the page that’s like a folder of all the different pages in your store.
Click on “Products” in the top menu bar. Inside the “Products” settings, you’ll see a list of all the products available in this store. (If you don’t see the product you’re looking for, go back to the Product settings under “Payments” where you created the product and toggle the switch to make it visible in online stores.)
In the Products settings in your store page, you can check and uncheck each product to make them available or unavailable in this particular store. (For example, you can have ALL your products set to “Include in Online Store” in Payments and then, in the Store settings you can uncheck the ones you don’t want people to see in the store.)
If you have any trouble, come to an Office Hours for hands-on help!
Invoices
Go to [Payments] in the left sidebar and then the Invoices tab in the top menu bar.
Create a new invoice or click on the invoice you want to send to a client.
Find the section labeled “Add Products” and click the button that says [+Add Product]. Choose the product you want to add from the dropdown list.
If you want to change the price, simply change what’s displayed in the editable field labeled “Price.”
Fill out the rest of the invoice info and click the [Send] button in the top right to send it to your client.
If you have any trouble, come to an Office Hours for hands-on help!